prosimo-logo-white-1.svg

MCN Foundation

Additional Questions

We have staff monitoring the MCN Foundation Slack channel, awaiting your questions. You will receive an  invitation to the following Slack Workspace once you’ve signed up: http://prosimomcnfoundation.slack.com/

If you would like a more in-depth architectural planning discussion, or to talk about additional capabilities outside of the MCN Foundation offering, you may request a session with one of our Solutions Architects.

Please ensure you familiarize yourself with the EULA for details on what’s included, specifically section 2.3:  https://prosimo.io/eula/

You should also familiarize yourself with the section: “Does Prosimo deliver additional capabilities, beyond Foundational MCN?”

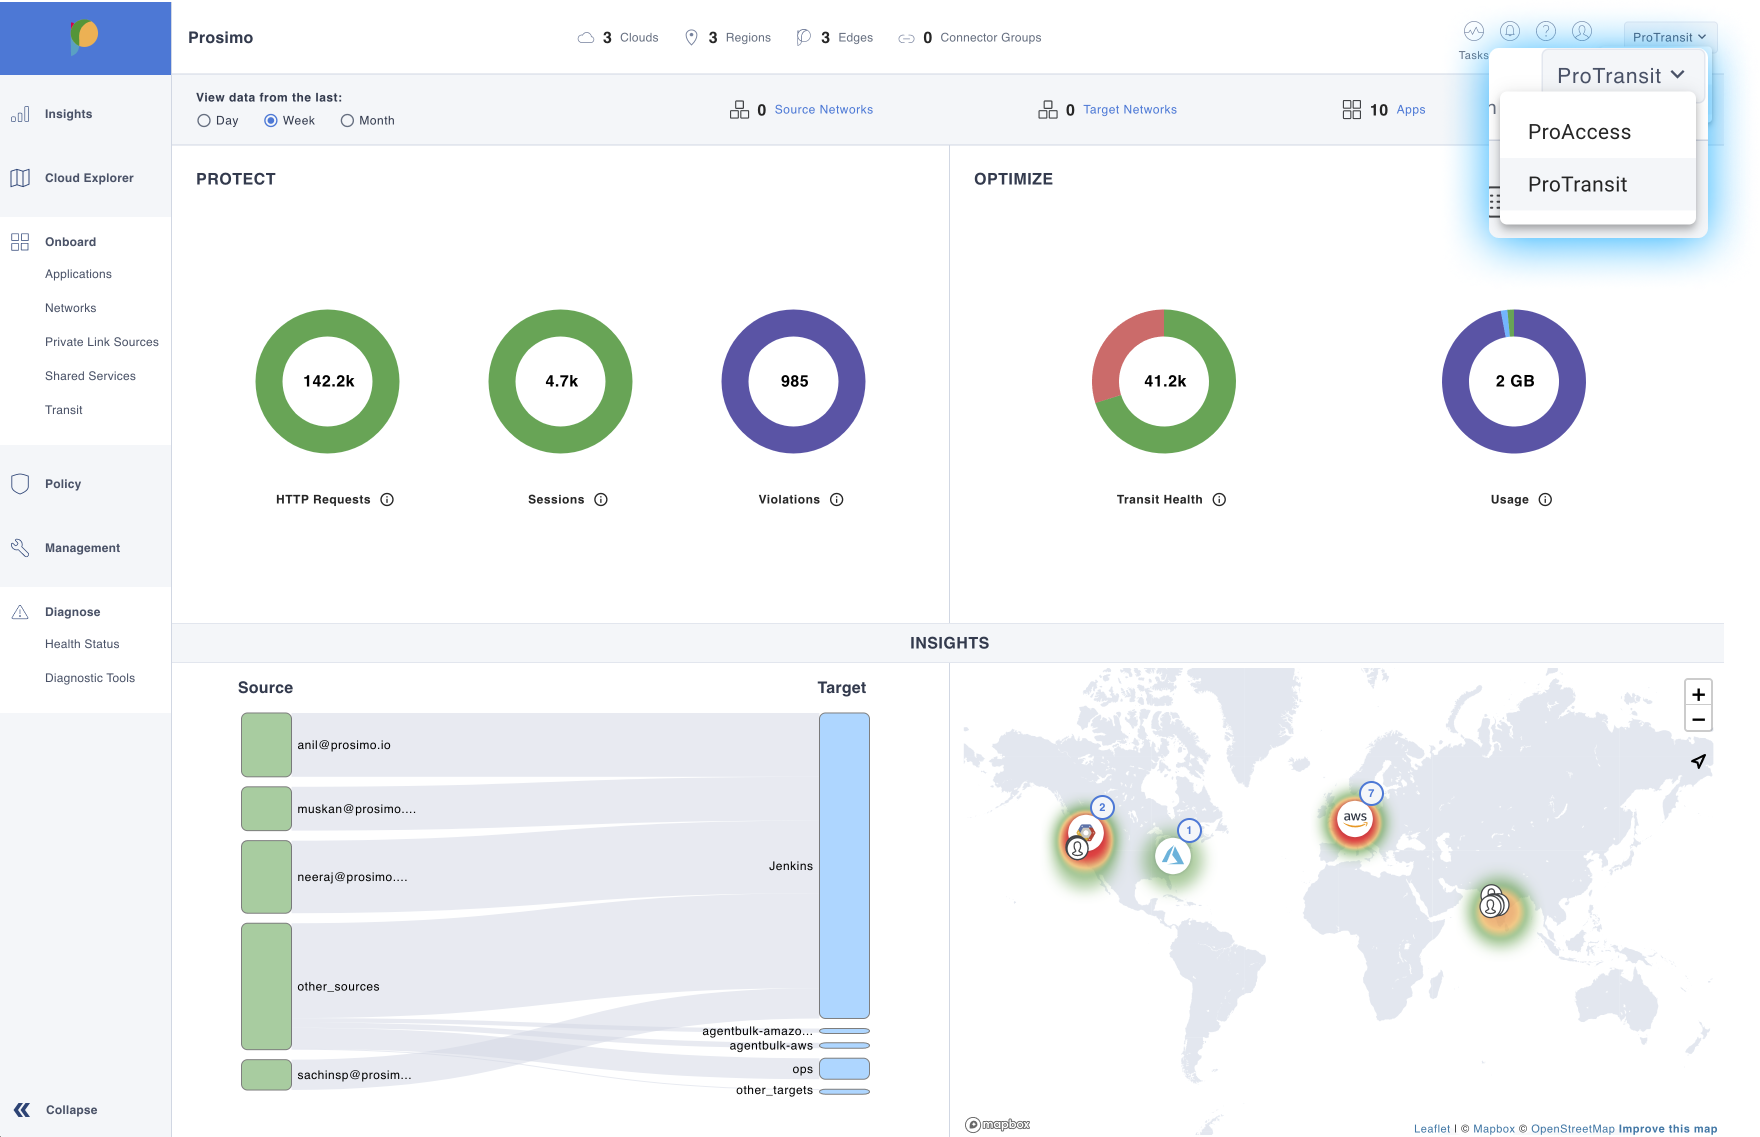
MCN Foundation delivers easy-to-use discovery, connectivity, observability, and troubleshooting capabilities. We find most organizations, once they rationalized and reconciled all their connectivity needs, are eager to further secure and operationalize their networks with ZTNA, App/Service networking, and more advanced Enterprise capabilities including Firewall Insertion, Egress Control, and Machine Learning recommendations.

Demo Videos

Quick Start Guide

Table of Contents

Introduction

Congratulations on choosing Prosimo! This quick start guide will walk you through the steps  required to provision Prosimo in your cloud infrastructure and prepare it for onboarding applications and networks. Upon successful completion, you will have achieved the following:

  1. Added your Cloud account in Prosimo dashboard to discover and build the Transit.
  2. Provisioned Prosimo Edges. 
  3. Discovered and onboard your networks and applications.

Requirements

  1. Sign Up for a Prosimo account
  2. An active cloud subscription with sufficient  privileges to create IAM roles
  3. A block of IP/CIDR for Prosimo Edges

Step-by-Step Instructions

1. Signing in to Prosimo Dashboard

Click on the web link in the email to Login into Prosimo Dashboard.
(example; https://acme.admin.prosimo.io)

You will be prompted with a Multi-Factor Authentication (MFA) on providing the credentials. Enter the One-time Verification Code sent to your email to complete the login.

NOTE: Prosimo supports Single Sign On (SSO), which can be set up after your initial login


2. Accessing Prosimo Dashboard

After logging in, you’ll find yourself on the Prosimo Dashboard. This all-in-one, unified user interface enables admins to onboard cloud networks, applications, set up policies, gather insights, troubleshoot, and much more.

The following image shows an example of a fully onboarded Prosimo Dashboard, complete with networks, applications, and connector groups, among other features.

Note: If you’re logging in for the first time, there won’t be any metrics to display just yet.

Ensure your use case context is ProTransit. – This can be found on the top right as shown in the image. 

The steps to configure a cloud provider in Prosimo may vary depending on your Cloud Service Provider (CSP)

3. Adding Cloud Accounts In Prosimo

The steps to configure a cloud provider in Prosimo may vary depending on your Cloud Service Provider (CSP). 

  1. Click on Management and select Cloud
  2. Click Create New
aws
AWS Accounts
  1. From the dropdown, choose your cloud provider and give it a Cloud Account/Nickname
  2. Choose your Preferred Authorization. The options are IAM and Access Keys. Prosimo recommends the IAM option.
  3. The next value to input is Add External ID. Copy the External ID and keep it secure for use in the following steps in AWS console. This ID is unique to every customer’s Infra account.
  4. Click on Generate AWS Keys link, which will redirect to your AWS>CloudFormation>Stack page. Leave the Prosimo window open to come back after the next step.
  1. In the AWS>CloudFormation>Stack page, paste the ‘External ID’ copied from Prosimo, add your AWS Account ID, and follow the remaining steps to create an ARN.
  2. Copy the ARN and go back to the Prosimo Dashboard.
  3. Paste the Role ARN generated from the previous AWS step and click the Create button. 


You now have your cloud account added to Prosimo! – Move to Step 4

azure-logo
Azure Accounts
  1. From the dropdown, choose your cloud provider Azure and give it a Nickname
  2. Enter Subscription ID, Tenant ID, Client ID and Secret Value from Azure
    HINT: In Azure go to Subscriptions and follow the steps to create a Service Principal to generate the above details. Create a Custom Role with required permissions for integration.

You now have your cloud account added to Prosimo!

gcp-logo
GCP Accounts
  1. From the dropdown, choose your cloud provider and give it a Nickname
  2. Upload the JSON file and click Create to add your cloud account.


HINT:
The following are the steps to create the service account JSON file. Go to the GCP Console and select APIs & Services. Follow the steps to enable GCP APIs. Proceed to create a Service Account for Prosimo. In Manage Keys, add key, with key type as JSON and create. Keep the downloaded JSON file. Assign a custom role to this Service Account. This role only requires minimal permissions to function correctly as a worker node instance.

You now have your cloud account added to Prosimo!

4. Configuring IP Address/CIDR

Prosimo requires allocation of non overlapping IP CIDRs for deploying Edge. An Edge is a Prosimo-managed cloud component deployed in the Kubernetes cluster of the customer’s cloud infrastructure.

Following are the steps to configure IP address/CIDR.
  1. Click on Management and select the IP addresses tile in Prosimo Dashboard
  2. Click Create New and choose the CSP configured from step 3 as the cloud provider
  3. Enter CIDR Block value.
NOTE: A minimum CIDR requirement of /23 is needed for AWS and Azure and /22 for GCP when orchestrating Prosimo Edge.
  1. Click Create to complete configuring IP address/CIDR.

5. Discovering and Building Transit

Prosimo helps you discover your existing cloud assets, for example, regions, cloud-native constructs (TGW, VWAN hub), VPC/VNETs, etc., and create a transit using Prosimo edges. Navigate to Transit Builder under the Onboard section of the left menu.

Discovery

The Transit view visually depicts the organization’s cloud transit infrastructure, enabling admins to construct the transit by choosing the necessary modular elements (like Transit Gateway (TGW), native peering, VPCs, etc.) across various regions and accounts.

The Transit map view displays the network in a geographically oriented manner. Leveraging the aspect of location, the map view facilitates the effortless discovery of Prosimo Edges across various regions.

This process begins with selecting the region where you wish to deploy Prosimo Edge, then opting for ‘Let’s start building transit’. The subsequent steps will guide you through the configuration process. After deploying an Edge, you can add connections to create TGW, and continue to discover and Add VPCs. When done, Preview Deployment and deploy. You have now successfully onboarded your networks.

6. Deploying Prosimo Edge

An Edge is a Prosimo-managed cloud component deployed in the  Kubernetes cluster of the customer’s cloud infrastructure. 

In this section, you will create an Edge using the Management wizard.

  1. Click Management and select Edge on Prosimo Dashboard.
  2. Click Create New and select cloud account added from Step 3 Adding Cloud Account in Prosimo.
  3. Click on Region to select.
  4. Select VPC Source has two options: Use Prosimo-created VPC and Use existing infra VPC. As a best practice, select Use Prosimo created VPC. To use an existing VPC to provision Prosimo Edge, please refer to the help for the requirements.
  1. Select the required Bandwidth. This selection helps with your scaling needs.
  2. Now choose the Instance Type. The available options are based on the Bandwidth selection in the previous step. Click Create to launch your first Edge!

After completing this final step, your Prosimo setup is now entirely ready!

Additional Resources

Having set up the Prosimo Edge, you’re now prepared to onboard applications, networks, and more.

This task can be accomplished by navigating to the ‘Onboarding’ section in the Prosimo Dashboard.

To access Prosimo Documentation, click Help at the top right corner of the Prosimo Dashboard. Select Documentation

Check out Prosimo Documentation > Knowledge for FAQs on the above topics

Summary

Once you have followed the above-listed steps, you should now have a cloud account added, configured IP/CIDR block, and deployed an Edge.

The outlined process in this guide aims to make your transition to Prosimo smooth and hassle-free, ultimately empowering you to fully leverage the robust features of Prosimo for efficient and secure cloud networking. 

Always remember, Prosimo’s support and your Solution Architect are ready to help if you need further assistance. 

Sign up for MCN Foundation